This website uses cookies. By clicking Accept, you consent to the use of cookies. Click Here to learn more about how we use cookies.
Turn on suggestions
Auto-suggest helps you quickly narrow down your search results by suggesting possible matches as you type.
- Revenera Community
- :
- InstallShield
- :
- InstallShield Forum
- :
- Radio Button
Subscribe
- Mark Topic as New
- Mark Topic as Read
- Float this Topic for Current User
- Subscribe
- Mute
- Printer Friendly Page
- Mark as New
- Subscribe
- Mute
- Permalink
- Report Inappropriate Content
Feb 27, 2015
06:31 AM
Suite Installer upgradation issue
Hi,
I created a Suite/Advanced installer, this installer contains three .exe packages. I am able to install the Suite installer perfectly, but while upgradation the packages are not getting upgraded.
Eg: For fresh installation Suite installer version is 1.0.0.0 and the three exe packages' version are 1.0.0.0 , 1.0.1.0 and 1.0.1.0. Now I changed the versions to Suite installer version to 2.0.0.0 and three exe packages to 2.0.0.0 , 2.0.0.0 , 2.0.1.0. Now I installed the suite installer(upgradation). But I could see only suite installer version got chaned from 1.0.0.0 to 2.0.0.0, but the three exe packages versions remain 1.0.0.0 , 1.0.1.0 and 1.0.1.0.
Could you please help me out how to upgrade the packages in suite installer while upgradation.
Thanks in advance
(30) Replies
- Mark as New
- Subscribe
- Mute
- Permalink
- Report Inappropriate Content
May 01, 2015
08:30 AM
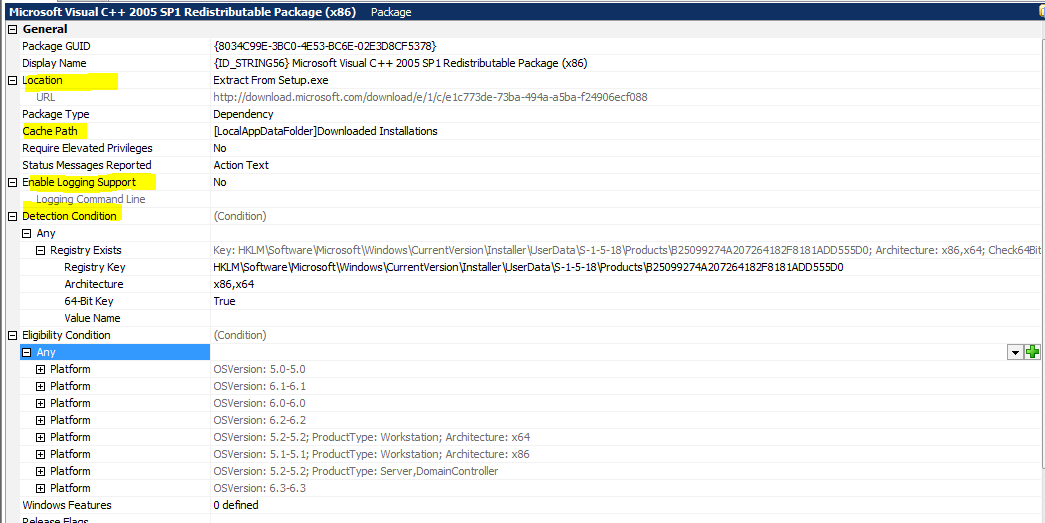
First, do you include a detection condition for the EXE packages, to determine if the correct package is installed? What type of condition does the EXE package itself use to determine if it is already installed. If you know this then you should duplicate the setting.
Next, the suite UI tries to execute all of your packages without a UI. However, that does not mean that you cannot present a UI. For instance when a user installs our application and selects to install the 'Main' server application, then I install SQL Server 2012. Part of the command line I provide specifies a reduce UI so that the user only sees the progress bar. For other exe packages I do not show a progress bar since those installations are very quick. If the /silent option is used with the package then I never show a progress bar. I would try to avoid showing a UI for your 'packages' as much as possible as you want to reduce the amount of interaction required by the user.
To debug a suite installer use:
/debuglog"C:\MyInstaller.log" /log"C:\InstallLogFiles\"
debuglog is the log file for the InstallShield Suite wrapper.
log is for the packages in your Suite project. Here you do not specify a log file name but just a directory. The file names are obtained by a setting for each package in your Suite project file.
Unfortunately there isn't any type of debugger for the Suite project so we can step through the project and see where it is failing. 😞
Since you have EXE packages, the command line settings can vary per package. Hopefully you have information on these packages on how to install them silently and to generate log files.
Below is an example I have for installing Microsoft Visual Studio C++ 2005 SP1 Redist, which is an EXE:
Next, the suite UI tries to execute all of your packages without a UI. However, that does not mean that you cannot present a UI. For instance when a user installs our application and selects to install the 'Main' server application, then I install SQL Server 2012. Part of the command line I provide specifies a reduce UI so that the user only sees the progress bar. For other exe packages I do not show a progress bar since those installations are very quick. If the /silent option is used with the package then I never show a progress bar. I would try to avoid showing a UI for your 'packages' as much as possible as you want to reduce the amount of interaction required by the user.
To debug a suite installer use:
debuglog is the log file for the InstallShield Suite wrapper.
log is for the packages in your Suite project. Here you do not specify a log file name but just a directory. The file names are obtained by a setting for each package in your Suite project file.
Unfortunately there isn't any type of debugger for the Suite project so we can step through the project and see where it is failing. 😞
Since you have EXE packages, the command line settings can vary per package. Hopefully you have information on these packages on how to install them silently and to generate log files.
Below is an example I have for installing Microsoft Visual Studio C++ 2005 SP1 Redist, which is an EXE:
- Mark as New
- Subscribe
- Mute
- Permalink
- Report Inappropriate Content
May 06, 2015
06:02 AM
DLee65 wrote:
First, do you include a detection condition for the EXE packages, to determine if the correct package is installed? What type of condition does the EXE package itself use to determine if it is already installed. If you know this then you should duplicate the setting.
Next, the suite UI tries to execute all of your packages without a UI. However, that does not mean that you cannot present a UI. For instance when a user installs our application and selects to install the 'Main' server application, then I install SQL Server 2012. Part of the command line I provide specifies a reduce UI so that the user only sees the progress bar. For other exe packages I do not show a progress bar since those installations are very quick. If the /silent option is used with the package then I never show a progress bar. I would try to avoid showing a UI for your 'packages' as much as possible as you want to reduce the amount of interaction required by the user.
To debug a suite installer use:/debuglog"C:\MyInstaller.log" /log"C:\InstallLogFiles\"
debuglog is the log file for the InstallShield Suite wrapper.
log is for the packages in your Suite project. Here you do not specify a log file name but just a directory. The file names are obtained by a setting for each package in your Suite project file.
Unfortunately there isn't any type of debugger for the Suite project so we can step through the project and see where it is failing. 😞
Since you have EXE packages, the command line settings can vary per package. Hopefully you have information on these packages on how to install them silently and to generate log files.
Below is an example I have for installing Microsoft Visual Studio C++ 2005 SP1 Redist, which is an EXE:
Hi,
Thanks for your help.
The issue of "Package Fail" error finally solved. The Exit Behavior condition for the packages was set to "Ask whether to continue the setup". This was changed to "Continue with setup", which resolved the issue.
Now I have another issue. I am trying to add Radio buttons instead of Check Boxes in feature selection tree. Is it possible to do so?
I tried to add a new page with just Radio buttons and deleted the Feature selection tree with default check boxes. I have tried all the conditions I could, but could not set them exact so that my Radio button selection and installation can be in sync. When I am selecting single Radio button for installing a single package all the packages under other Radio buttons are being installed. What all properties need to be set for Radio Buttons to sync with Install.
*Requirement is specifically for Radio button. Checkboxes needs to be replaced.
Thanks in advance for all your responses.
- Mark as New
- Subscribe
- Mute
- Permalink
- Report Inappropriate Content
May 06, 2015
06:31 AM
The feature tree selection is not able be modified that I know.
I had to create a custom dialog with my radio button controls and not use the feature tree. For me the issue was allow the user the option to select if this instal is for the main database computer or a client computer. So I just created a custom dialog that shows the two options with an explanation about the options.
I had to create a custom dialog with my radio button controls and not use the feature tree. For me the issue was allow the user the option to select if this instal is for the main database computer or a client computer. So I just created a custom dialog that shows the two options with an explanation about the options.
- Mark as New
- Subscribe
- Mute
- Permalink
- Report Inappropriate Content
May 06, 2015
06:55 AM
DLee65 wrote:
The feature tree selection is not able be modified that I know.
I had to create a custom dialog with my radio button controls and not use the feature tree. For me the issue was allow the user the option to select if this instal is for the main database computer or a client computer. So I just created a custom dialog that shows the two options with an explanation about the options.
Hi,
But how do I append Features with Radio Buttons and link it with Install option. That is where I am stuck right now.
- Mark as New
- Subscribe
- Mute
- Permalink
- Report Inappropriate Content
May 06, 2015
07:28 AM
When you create your radio buttons you are going to create a property for the group. Use this property to control the feature or even component states. If you are showing the feature tree as well, mark the feature with the options as not visible.
On my dialog I have two radio button controls. Select one of your radio button controls. Look at the content properties on the right. Set a property that you can use - I used MAIN_COMPUTER==YES.
Select your next radio button control and set a value for the same property, MAIN_COMPUTER==NO.
If you have more than two radio button controls just set the values to something reasonable for your install context. I do recommend using all upper case characters for a public property so you can allow users to install this from a command line and set the property with the command line.
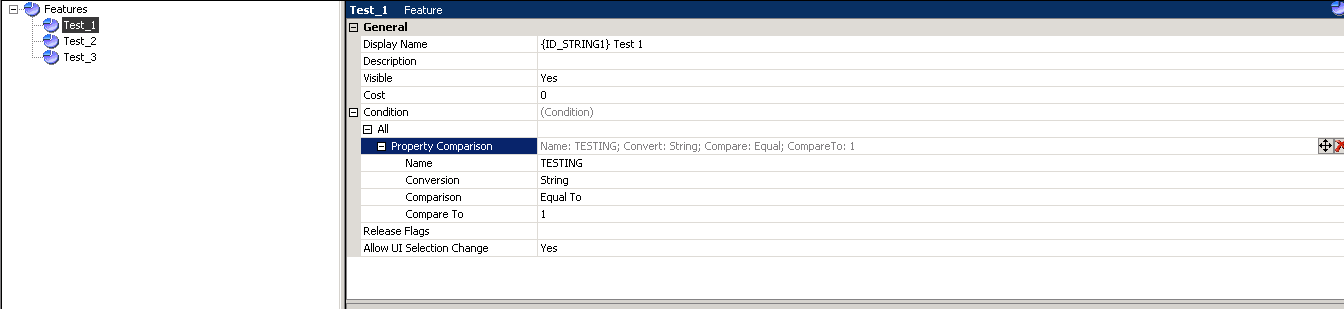
After creating the property, go to features. Select a feature that you want to control.
Create a new condition for the feature. I added 'All, Property Comparison' where the Name=MAIN_COMPUTER, string, Equal, & Compare To: YES (or the value that should be used to install the feature).
Repeat this process with any other features that should be optional.
On my dialog I have two radio button controls. Select one of your radio button controls. Look at the content properties on the right. Set a property that you can use - I used MAIN_COMPUTER==YES.
Select your next radio button control and set a value for the same property, MAIN_COMPUTER==NO.
If you have more than two radio button controls just set the values to something reasonable for your install context. I do recommend using all upper case characters for a public property so you can allow users to install this from a command line and set the property with the command line.
After creating the property, go to features. Select a feature that you want to control.
Create a new condition for the feature. I added 'All, Property Comparison' where the Name=MAIN_COMPUTER, string, Equal, & Compare To: YES (or the value that should be used to install the feature).
Repeat this process with any other features that should be optional.
- Mark as New
- Subscribe
- Mute
- Permalink
- Report Inappropriate Content
May 06, 2015
08:22 AM
DLee65 wrote:
When you create your radio buttons you are going to create a property for the group. Use this property to control the feature or even component states. If you are showing the feature tree as well, mark the feature with the options as not visible.
On my dialog I have two radio button controls. Select one of your radio button controls. Look at the content properties on the right. Set a property that you can use - I used MAIN_COMPUTER==YES.
Select your next radio button control and set a value for the same property, MAIN_COMPUTER==NO.
If you have more than two radio button controls just set the values to something reasonable for your install context. I do recommend using all upper case characters for a public property so you can allow users to install this from a command line and set the property with the command line.
After creating the property, go to features. Select a feature that you want to control.
Create a new condition for the feature. I added 'All, Property Comparison' where the Name=MAIN_COMPUTER, string, Equal, & Compare To: YES (or the value that should be used to install the feature).
Repeat this process with any other features that should be optional.
Hi,
Thanks a lot for your response. According to your suggestion I tried and it works fine with 2 Radio buttons. But when I am trying with 3 Radio Buttons I am trying 0 and 1 logic, but its failing. It's either not installing anything or its installing everything.


Thanks for your quick responses.:)
- Mark as New
- Subscribe
- Mute
- Permalink
- Report Inappropriate Content
May 06, 2015
10:02 AM
I am not certain here. Try putting quotes around the value that you set, MYVALUE="0", MYVALUE="1", MYVALUE="2", etc. OR you can change your test from string to number. I suspect that is causing the problem but I am not 100% sure on this.
- Mark as New
- Subscribe
- Mute
- Permalink
- Report Inappropriate Content
May 07, 2015
10:10 AM
DLee65 wrote:
I am not certain here. Try putting quotes around the value that you set, MYVALUE="0", MYVALUE="1", MYVALUE="2", etc. OR you can change your test from string to number. I suspect that is causing the problem but I am not 100% sure on this.
Hi,
I have tried every possible combination for this to work but I have been unsuccessful. I have set a single property in property manager and set its value to 1. In radio buttons content properties I have added 1 ,0,1. Under event I have added set property value comparing with property manager condition. Same has been compared in features view.
The installation does begin but only of those features which are in exact comparison with property manager. I have tried "" and used different property values in manager too.
The radio button group is non functional in this as its a suite installation.
Any help is appreciated.
Thanks again.
- Mark as New
- Subscribe
- Mute
- Permalink
- Report Inappropriate Content
May 12, 2015
01:53 AM
Hi DLee,
I have tried adding Radio/ComboBox for my package selection in Suite Project but unable to link my radio/dropdown selection with the Features linked with PAckages.
Can you please throw some light on the complete process of :
1.Setting/Getting properties in install script of suite.
2.Adding these in actions with conditional settings.
3.Binding the event/actions created with my drop-down/radio buttons selection on wizard page.
This is kind of crucial project for me. Kindly suggest how can this be done.
Regards
- Mark as New
- Subscribe
- Mute
- Permalink
- Report Inappropriate Content
May 12, 2015
11:11 AM
For features that are going to be controlled by your option boxes, set the visible level of these features to No.
Only display the features you want the user to have control over, such as help documentation, sample files, etc.
Remove the property settings from the property table. You want the user to have to select something from your option list. You have constructed the Property correctly, the only thing I am not sure about is the numeric value and if InstallShield treats the assignment as text or as a number.
For InstallScript custom actions, you have the use of:
SuiteGetProperty("MyMostExcellentProperty", propertyValue);
To assign a value to a property:
SuiteSetProperty("MyMostExcellentProperty", myStringValue);
It does not look like you can set a numeric value for the suite property, which is why I am not certain about how it handles your numeric assignment.
Try assigning logical names to the properties. This will make it easier for your customer as well if they ever want to install using a command line. It is easier to understand rather than using magic numbers.
For example, I have a property called "MAIN_COMPUTER".
If the user selects the option button that this is the server / main computer then the value gets set to "YES", otherwise the value is set to "NO".
Use the same property for all three of your options, but set the value of the property to something different.
Below is an example of code I wrote using InstallScript to test for screen resolution.
Let me know if you require anything more.
Only display the features you want the user to have control over, such as help documentation, sample files, etc.
Remove the property settings from the property table. You want the user to have to select something from your option list. You have constructed the Property correctly, the only thing I am not sure about is the numeric value and if InstallShield treats the assignment as text or as a number.
For InstallScript custom actions, you have the use of:
SuiteGetProperty("MyMostExcellentProperty", propertyValue);
To assign a value to a property:
SuiteSetProperty("MyMostExcellentProperty", myStringValue);
It does not look like you can set a numeric value for the suite property, which is why I am not certain about how it handles your numeric assignment.
Try assigning logical names to the properties. This will make it easier for your customer as well if they ever want to install using a command line. It is easier to understand rather than using magic numbers.
For example, I have a property called "MAIN_COMPUTER".
If the user selects the option button that this is the server / main computer then the value gets set to "YES", otherwise the value is set to "NO".
Use the same property for all three of your options, but set the value of the property to something different.
Below is an example of code I wrote using InstallScript to test for screen resolution.
function ScreenResolutionGood(oExtension)
	NUMBER nResult, nvDx, nvDy;
	STRING sMsg;
begin
	nResult = GetExtents(nvDx, nvDy);
	sMsg = "True";
	if (nvDx < 1024 || nvDy < 768) then
		sMsg = "False";
	endif;
	SuiteLogInfo("Screen Resolution %d, %d", nvDx, nvDy);
	SuiteSetProperty("ScreenResolutionGood", sMsg);
end;
Let me know if you require anything more.