- Revenera Community
- :
- InstallShield
- :
- InstallShield Forum
- :
- Re: Brand new installation fails with 1603 error trying to install .NET 1.0
- Mark Topic as New
- Mark Topic as Read
- Float this Topic for Current User
- Subscribe
- Mute
- Printer Friendly Page
- Mark as New
- Subscribe
- Mute
- Permalink
- Report Inappropriate Content
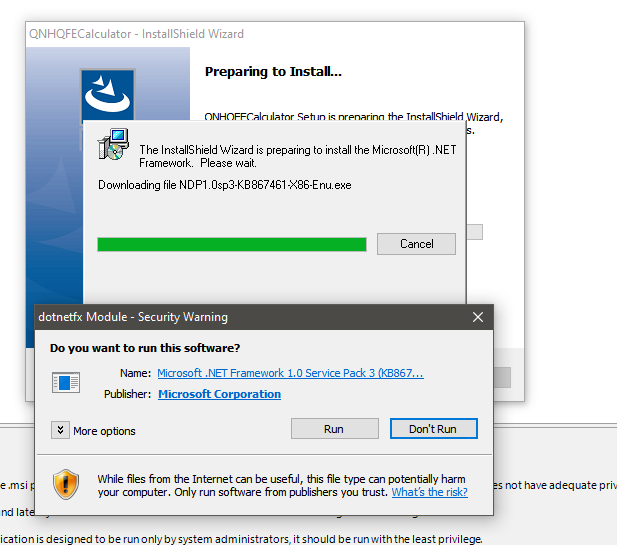
Brand new installation fails with 1603 error trying to install .NET 1.0
Hi
I ran the C# wizard against a C#/.Net472 Winforms app, and changed *nothing* else (no requirements, no pre-requisites etc)
When the setup is run on Windows 10 machines with .Net 8 installed the installation fails with a 1603 error - the first step it tries to run is to attempt to install .Net 1.0 Service Pack 3
What is going on here - why on earth is it trying to install 15 year old versions of .Net...?
Currently evaluating InstallShield but hitting this as a show-stopper with the simplest out-of-the box setup is not confidence-inspiring...
- Mark as New
- Subscribe
- Mute
- Permalink
- Report Inappropriate Content
Hi @MattTrinder ,
If you are evaluating InstallShield and have any questions or issues, for faster response, please raise a support ticket.
Please contact Revenera support:
https://www.revenera.com/about-us/contact-us.html
https://community.flexera.com/t5/InstallShield-Knowledge-Base/How-to-Use-Revenera-Support-Chat-to-He...
https://community.flexera.com/t5/Support-Information/Support-Contacts/ta-p/94720
- Mark as New
- Subscribe
- Mute
- Permalink
- Report Inappropriate Content
Take a look at the IsReleaseExtended table in the Direct Editor option of your project.
IsReleaseExtended - table
DotNetRedistLocation - column
Value of 0 = 'Copy from Source Media'
Value of 1 = 'Extract from Setup.exe'
value of 2 = 'Download from Web'
value of 3 = 'Do Not Include'
The default value should be 3 which will prevent your installer from including .NET
If the value is something other than 3, then there will be some other mechanism during your build process which is causing this change.
- Mark as New
- Subscribe
- Mute
- Permalink
- Report Inappropriate Content
- Mark as New
- Subscribe
- Mute
- Permalink
- Report Inappropriate Content
There are a couple of options here:
If you are using Visual Studio to edit your project, VS will automatically convert the project to XML.
This will enable you to open the project in a text editor such as notepad:
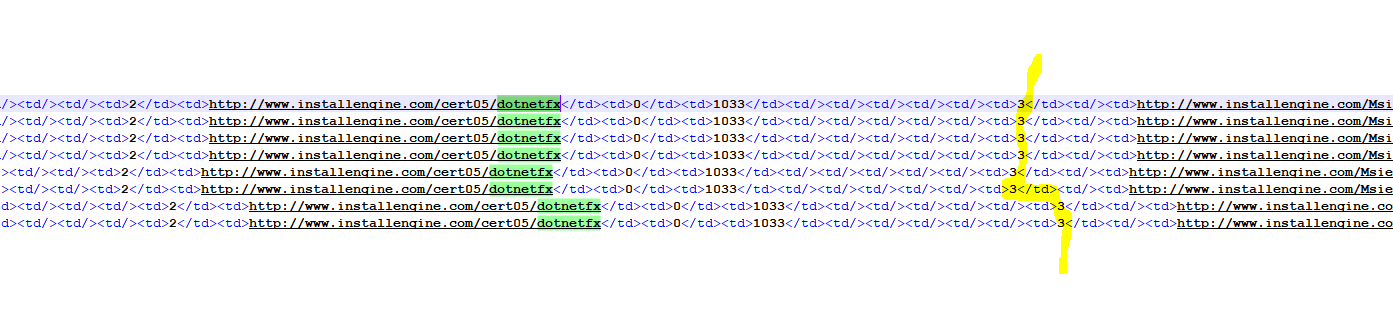
1. Open your .ism project file with notepad
2. Locate the lines with the values "http://www.installengine.com/cert05/dotnetfx".
3. Replace the 2 value with 3 - I've attached to this support case a screenshot (Capture.JPG) of the xml with the value to change highlighted.
If you are not using VIsual Studio, then you can download Microsofts windows Installer Editor tool called Orca:
https://docs.microsoft.com/en-us/windows/win32/msi/orca-exe
You will be able to use Orca to open the .ise project file and view/edit the tables.
- Mark as New
- Subscribe
- Mute
- Permalink
- Report Inappropriate Content
Hi @MattTrinder ,
As suggested by @shunt , can you change the values from "2" to "3".
I think, you have changed in the wrong column. So can you update again as in the below screenshot:

change the values just before the "http://www.installengine.com/cert05/dotnetfx" string ( <td>3</td><td>http://www.installengine.com/cert05/dotnetfx).
OR
There is a setting configuration in "C:\Program Files (x86)\InstallShield\2020\Support\0409\settings.xml", which help you to change these values through the IDE.
1- Search for the string "<DotNetTabReleases Hide="1"/>" in the settings.xml, and then change the value to "<DotNetTabReleases Hide="0"/>. Save the settings.xml.
2- Close and reopen all the application(InstallShield and Visual studio IDE) and InstallShield projects.
3- Navigate to Releases view, change the value to "Do Not Include" for the ".NET Framework Location" for all the releases in the "Releases" view, as shown in the below screenshot image.

Hope this help you to proceed the evaluation.