- Revenera Community
- :
- InstallShield
- :
- InstallShield Knowledge Base
- :
- How to Create Desktop Shortcuts in a MSIX Project Using the Package Support Framework
- Mark as New
- Mark as Read
- Subscribe
- Printer Friendly Page
- Report Inappropriate Content
How to Create Desktop Shortcuts in a MSIX Project Using the Package Support Framework
How to Create Desktop Shortcuts in a MSIX Project Using the Package Support Framework
Introduction
This article details the process of generating desktop shortcuts within an MSIX project using the Package Support Framework (PSF).
By default, MSIX packages don't inherently support the installation of a desktop shortcut due to Microsoft's limitation on user-driven preferences. Therefore, actions such as creating a Desktop shortcut or pinning it to the Taskbar or Start Menu are beyond the user's direct control.
However, if you still need to deploy an application shortcut on a user's Desktop through an MSIX package, there is a option available. In this article, we'll explore that option to accomplish this task.
Instructions
Configure the MSIX package to support "Application alias" package. To do that, follow the steps below:
- Create a MSIX project.
- Add your .exe file under the Files and Folder View > INSTALLDIR.
- Go to the Applications View and create a shortcut for the newly added .exe file.
- Select the Key Name field on righthand pane.
- Rename it to the same name as the shortcut name:
- Go to Declarations.
- Right-click then add "New Declaration set."
- "Declaration Set 1" will be added.
- Right-click on "Declaration Set 1."
- Add a "New Custom Declaration."
- On the righthand pane, select the Namespace field dropdown menu then select "Xmlns:uap3= , and xmlns:desktop=" as shown below:

<uap3:Extension
    Category="windows.appExecutionAlias"
    Executable="[ExecutableName]"
    EntryPoint="Windows.FullTrustApplication">
    <uap3:AppExecutionAlias>
        <desktop:ExecutionAlias Alias="[AliasName]" />
    </uap3:AppExecutionAlias>
</uap3:Extension>


15. Make sure the shortcut is created in the Start Menu.
16. Press Win+R then type the application name and check that your application launches successfully, which means the alias exe shortcut was created successfully:
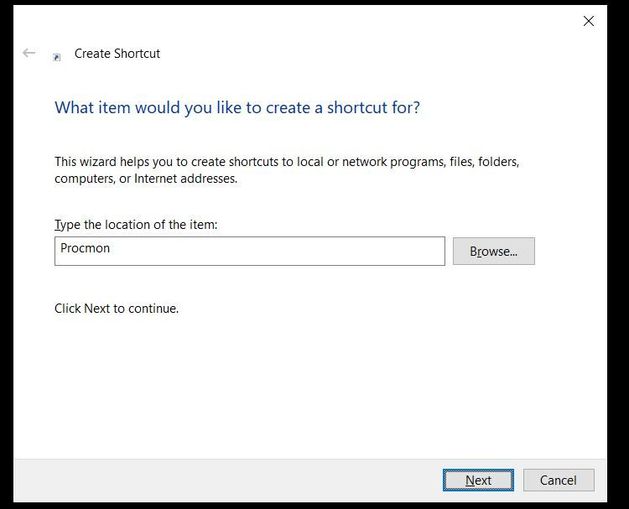
17. Go to the user's Desktop then right-click and select New --> Shortcut and enter your exe name and click Finish:
18. A new shortcut with the name, provided in the dialog above, will be created on the user's Desktop.
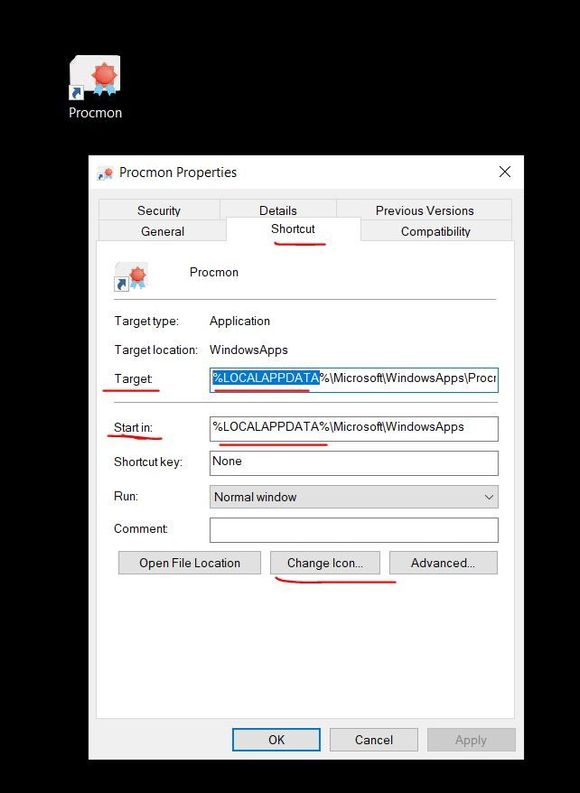
19. Right-click the Desktop shortcut then select Properties --> and select the shortcut tab.
20. Change the target path field and start in field to the LocalAppData path as shown below:


24. Now, we have to automate this process using PowerShell in the Package Support Framework (PSF).
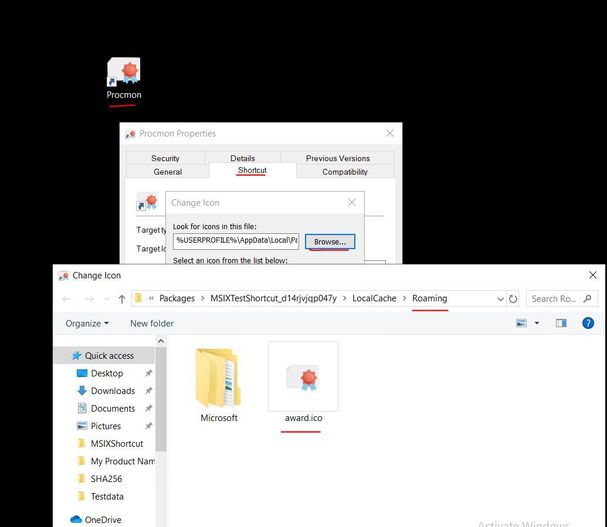
25. Copy the icon file and the newly created shortcut in to our test data folder as shown below: 
26. Add the value copied from above to the project .ism file > INSTALLDIR: 
27. Download the attached ZIP files then extract them and paste them into the same test data folder (the .json file, createshortcut.ps1 file, and the StartingScriptWrapper.ps1 file).
28. Edit the .json file and change the executable name to your exe name and edit the id and change the shortcut to the "Key Name" field value.
29. Save then close the jason file.
30. Now, open our MSIX package's project .ism file then go to the Application View --> Select the shortcut created and select Fixup Type under "Package Support Framework."
31. Click on the + icon then select Custom Fix Up:
32. Set Architecture to x86 and the .json path to the test data folder where the .json file was copied to:
33. Now edit the createshortcut.ps1 file then change the path and name of the file, per the shortcut and .ico file that was created. Save and close the powershell script file:
34. Go to the Files and Folders View and add both StartingScriptWrapper.ps1 and createshortcut.ps1 in to our project's INSTALLDIR
35. Select the Root Node (the Destination computer node) then add the JSON file config.json and save the project .ism file:
36. Save and Build the project.
37. Install the newly built MSIX package.
38. Observe a desktop shortcut is created when launching your application, which runs the PowerShell script to create the Desktop shortcut.
NOTE:
- Make sure all machines have the remote execution policy enabled to run a PowerShell script without any issues.
- The workaround installs a conventional .lnk desktop shortcut rather than a contemporary application entry.
- The script is triggered only after the application is initiated, allowing the Desktop shortcut to be copied.
- The MSIX uninstallation process does not include the removal of Desktop shortcuts, necessitating a separate action to address this, which is currently not supported using script as well.
- Inadvertently deleting the Desktop shortcut won't be resolved by repairing the MSIX package, as it won't automatically restore the shortcut. Reinstallation after uninstallation of the MSIX package is necessary to recover the Desktop shortcut.
More Information
Click here for Microsoft PSF help link.
Click here for Microsoft documentation on how to create a desktop shortcut.


