- Revenera Community
- :
- InstallAnywhere
- :
- InstallAnywhere Knowledge Base
- :
- Generating Patches with InstallAnywhere
- Mark as New
- Mark as Read
- Subscribe
- Printer Friendly Page
Generating Patches with InstallAnywhere
Generating Patches with InstallAnywhere
Summary
The following example illustrates a guide to creating patch installers using InstallAnywhere, complete with sample projects (see Attachment: GeneratingPatchesWithInstallAnywhere.zip). This example may be especially helpful for developers interested in FlexNet Connect.Synopsis
The following example illustrates a guide to creating patch installers using InstallAnywhere, complete with sample projects (see Attachment: GeneratingPatchesWithInstallAnywhere.zip). This example may be especially helpful for developers interested in FlexNet Connect.Discussion
| In this example, a program called Text Editor 1.0 was first generated and installed. Then a Simple Text Editor 1.1 patch was created. It updated core files, added some additional files, and removed any deprecated files. The patch should be installed in the same folder as 1.0, and it should only be executed if 1.0 is already installed. If someone installs 1.0, then 1.1, and then uninstalls 1.1, all the files should be uninstalled no matter if they were installed by the 1.0 installer or the patch installer.
1. Create version 1.0 installer. 2. Make a copy of the version 1.0 project. Rename it. |
This is a step of convenience. You can create patch project from scratch, but you would need to re-add all files and reconfigure your project. Using a copy of the original project gives you a nice base to start from.
3. Open the new Project.Feel free to make changes to the Installer Title and Product Name to reflect that this is a patch installer.
4. Update Product Version in Project > General Settings > Product Information.
6. Remove any unnecessary Panels and Actions from the Pre-Install Sequence.
The patch will be installed in the existing product directory so we don?t need to ask the user to install the patch. This means the Choose Install Folder panel needs to be removed. No shortcuts will be installed by the patch Choose Shortcut Destination Panel is also not necessary.
7. Add a Find Component in Registry Action.
To detect if a previous version of Simple Text Editor is already installed, the InstallAnywhere Registry needs to be searched. The Common Component ID (from Step 1) must be entered here.
8. Add a Show Message Dialog.
This Action will tell the user that a previous version of Simple Text Editor has not been found, and it is required for this patch installer to run.
9. Add a Compare InstallAnywhere Variable Rule to the Show Message Dialog.
This Rule must be added so that the dialog only appears if the Component ID is not found.
10. Add a Set InstallAnywhere Variable Action.
This Action sets the install folder of the patch to the install location of the previously installed instance of Simple Text Editor.
11. Remove unnecessary Actions in the Install Sequence.
Certain Actions like the Actions to create shortcuts and launchers do not need to be executed in a patch so you should remove those Actions to streamline the patch. Leave the Uninstaller untouched. Do not remove it.
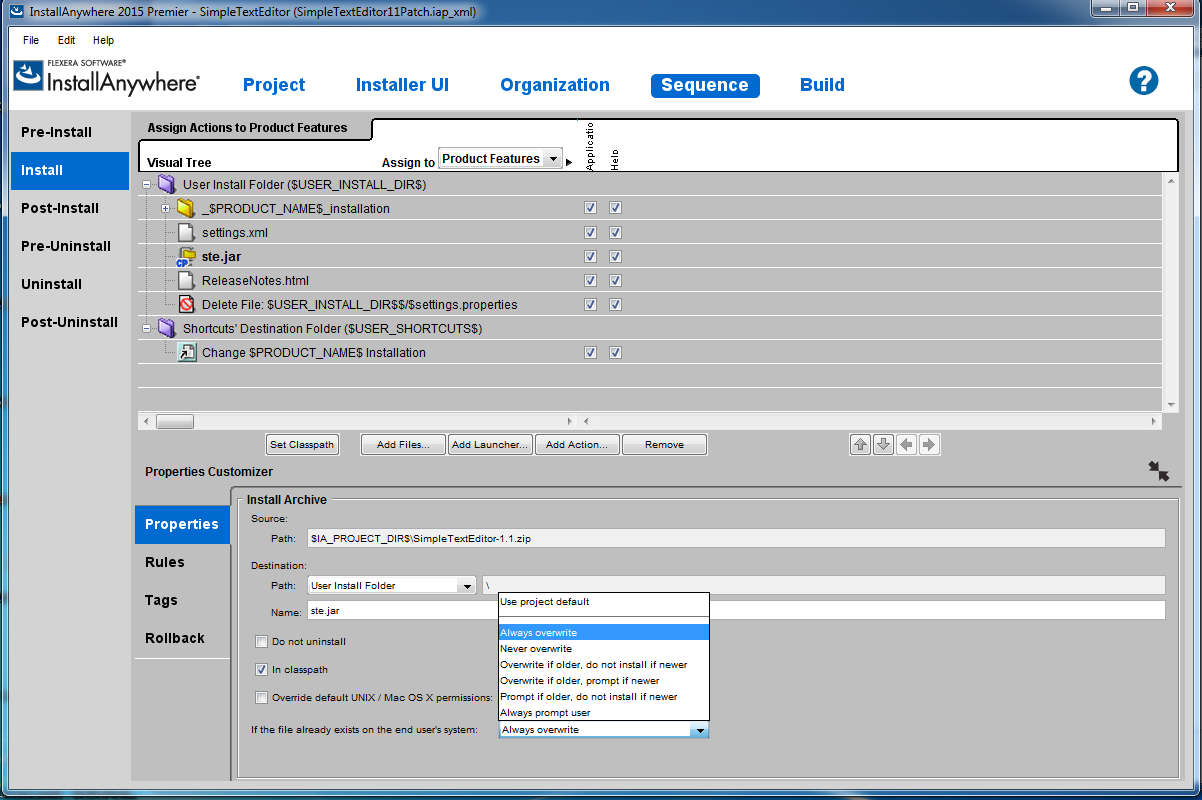
12. Add updated file contents.
Make sure File overwrite behavior is set to Always overwrite. This will prevent the installer from asking whether or not the installer should overwrite an existing file. Since this is a patch installer you always want this to happen.
13. Add any other Actions that may be required.
If you need to remove files that are no longer necessary used, take advantage of the Delete File and Delete Folder Actions.
Additional Information
For more information about the location of the InstallAnywhere Registry file, click here.The InstallAnywhere IDE GUI was revamped in InstallAnywhere 2013. To see this patch installer documentation for InstallAnywhere 2012 and prior versions, click here.
Is it possible to update this tutorial to the last InstallAnywhere version (2018).
For example at step 12 when you select st.jar in 2018 version it is impossible to update the path.
Also when I launch the patch installer it founds a wrong install directory
Best Regards
Is there an InstallAnywhere 2020 version of this tutorial? Thanks.
There is an issue with the " Find Component in Registry Action" . In case you don't know which JRE your installer is going to run you must check the "Search in both 32-bit and 64-bit InstallAnywhere registries" checkbox available in the properties of the Find Component in Registry action.