This website uses cookies. By clicking Accept, you consent to the use of cookies. Click Here to learn more about how we use cookies.
Turn on suggestions
Auto-suggest helps you quickly narrow down your search results by suggesting possible matches as you type.
- Revenera Community
- :
- InstallShield
- :
- InstallShield Knowledge Base
- :
- Install to the 64-bit Program Files Folder
Subscribe
- Mark as New
- Mark as Read
- Subscribe
- Printer Friendly Page
- Report Inappropriate Content
Install to the 64-bit Program Files Folder
Install to the 64-bit Program Files Folder
Summary
This article discusses how to install to the 64-bit Program Files folder on a 64-bit Windows operating system.Synopsis
This article discusses how to install to the 64-bit Program Files folder on a 64-bit Windows operating system.Discussion
A 64-bit MSI installation needs to be created to install files to 64-bit locations and modify registry information in the 64-bit registry. The directory C:\Program Files on a 64-bit machine is a 64-bit location while C:\Program Files (x86) is a 32-bit location on a 64-bit machine.A 32-bit installation can run on 64-bit machines but cannot install to 64-bit locations or write to the 64-bit registry portion. The installation information gets automatically redirected to 32-bit file locations (C:\Program Files (x86), C:\Windows\SysWow64) or the 32-bit Registry node under HKEY_LOCAL_MACHINE\SOFTWARE\Wow6432Node
Here are some sample steps to create a 64-bit installation that installs to the 64-bit Program Files Folder:
-
Create a new basic MSI project
-
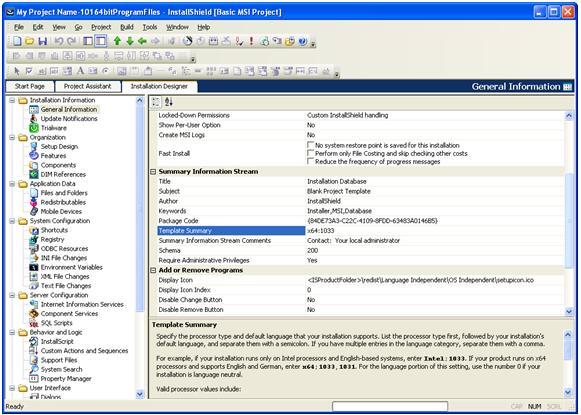
Configure the Template Summary property with the appropriate 64-bit value (x64 or Intel64)
-
Select the Installation Designer tab -> Expand Installation Information -> select General Information -> Summary Information Stream -> Template Summary -> x64;1033
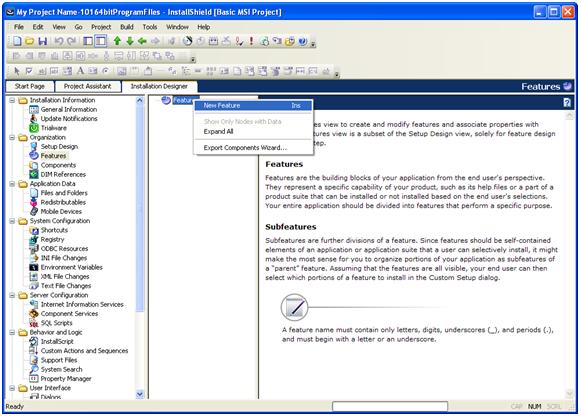
 Create a new feature.
-
Select the Installation Designer tab -> Expand Organization -> select Setup Design -> Right Click on Setup Design in the middle pane -> Select New Feature

-
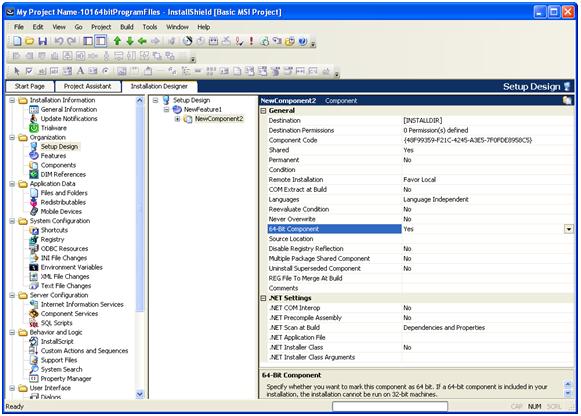
Create a new 64-Bit component under that feature.
-
Select the Installation Designer tab -> Expand Organization -> select Setup Design -> Right Click on a feature in the middle pane -> Select New Component -> Change the 64-Bit Component attribute to Yes

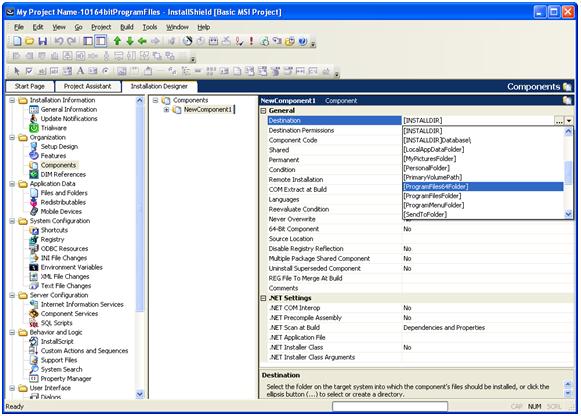
Change the Destination of the Component to ProgramFiles64Folder.-
If ProgramFiles64Folder is not listed in the dropdown list, select the Application Data -> Files and Folders -> Under Destination Computer?s folders view (bottom left pane) -> Right Click on Destination Computer -> Select Show Predefined Folder -> select the [ProgramFiles64Folder]

-
Add file/files to the component created earlier.
-
Select the Installation Designer tab -> Organization -> Components -> Select Component in the middle pane -> Expand the component -> Select Files -> Right Click in the Right pane -> Select Add -> Browse to file
-
-
Build and Test
-
-
-
-
Additional Information
Release flags can be used to build two separate installations (one 32 bit and one 64 bit) from a single project. For additional information on building separate installations from a single project please see the following HelpNet article: Targeting 64-Bit Operating Systems
No ratings