This website uses cookies. By clicking Accept, you consent to the use of cookies. Click Here to learn more about how we use cookies.
Turn on suggestions
Auto-suggest helps you quickly narrow down your search results by suggesting possible matches as you type.
- Revenera Community
- :
- InstallShield
- :
- InstallShield Knowledge Base
- :
- Accessing the MSI Database at Run Time
Subscribe
- Mark as New
- Mark as Read
- Subscribe
- Printer Friendly Page
- Report Inappropriate Content
Accessing the MSI Database at Run Time
Accessing the MSI Database at Run Time
Summary
This article provides an overview of accessing and temporarily modifying MSI database tables at run time using custom actionsSynopsis
AbstractIn some cases, it can be useful for a running installation to access the tables of the running MSI database. This article provides an overview of accessing and temporarily modifying MSI database tables at run time using custom actions.
Discussion
Accessing Database TablesIn VBScript, the Session object provides a Database property, which represents the running MSI database. (In InstallScript and C, the API function MsiGetActiveDatabase returns the same information.) In a custom action, you can execute SQL queries on the running database.
Performing SQL Queries
The steps to access an MSI database at run time are the following.
1. Open a view to the running database, using a SQL SELECT statement.
2. Execute the view.
3. Fetch the records returned by the view, and extract data from the desired fields.
4. Close the view.
Step 1 involves creating a SQL SELECT statement. The general form of a SELECT statement is the following.
SELECT Fields FROM Tables
For example, to select all the fields from the FeatureComponents table, the query would appear as follows, using the asterisk (*) to indicate all the fields.
SELECT * FROM `FeatureComponents`
To avoid conflicts with SQL keywords, it is recommended you place field and table names in backquotes (`).
Another way to perform the same query is to explicitly identify the desired field names:
SELECT `Feature_`,`Component_` FROM `FeatureComponents`
You can additionally narrow a SELECT statement using a WHERE clause followed by a comparison between a field value and a constant string, or between two field values. For example:
SELECT * FROM `Control` WHERE `Dialog_`='SetupCompleteSuccess'
Constants used in a comparison should be enclosed in single quotes (').
The MSI Help Library page "SQL Syntax" describes more keywords that can be used in queries on an MSI database. Note that MSI supports only a subset of "full" SQL syntax: for example, the LIKE and LEN operators are not supported.
What a SQL query returns is a set a records that match the query. A record, or row, is an indexed set of fields, and your custom action code can use the StringData and IntegerData properties of a Record object to retrieve the desired data. For example, suppose a custom action performs the following query:
SELECT `Feature`,`Level` FROM `Feature`
Each record returned will contain two fields: the Feature field, which contains the string identifier for a feature, and the numeric Install Level value for the feature. In code (assuming the record object is stored in a variable called rec), you would use the following to refer to the first (string) field of a fetched record:
rec.StringData(1) ' indexing starts with 1
And you would use the following to refer to the second (integer) field of a fetched record:
rec.IntegerData(2)
To determine the type of data used by a field, you can view the desired table's MSI Help Library page. An easy way to open the help page for a specific table is to select the table in InstallShield's Direct Editor view and press F1.
Example: Querying the Property Table
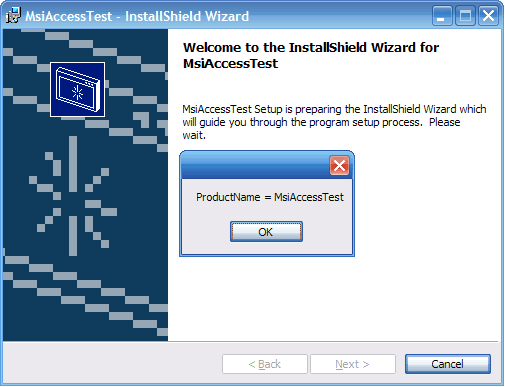
For example, the following code fetches the ProductName record from the Property table, and then displays the ProductName value. (This example is simply for illustration; in this particular case, the expression Session.Property("ProductName") returns the same information.)
Const IDOK = 1

Function ReadProductName( )

' open and execute the view
Set oView = Database.OpenView("SELECT `Value` FROM `Property` WHERE
    `Property`='ProductName'")
oView.Execute

' fetch the one and only ProductName record
Set oRecord = oView.Fetch

' display the string data from the fetched record
MsgBox "ProductName = " & oRecord.StringData(1)

' clean up
oView.Close

' return success to MSI
ReadProductName = IDOK
End Function
To use the previous code in a custom action, place the code in a VBScript source file called (for example) ReadProductName.vbs.
Next, in the Custom Actions view of the IDE, right-click the Custom Actions icon and select New VBScript > Stored in the Binary table, renaming the action icon to (say) callReadProductName.
In the property list for the callReadProductName action, specify the following settings:
- VBScript Filename: <readprodnamesrc>\ReadProductName.vbs (browse for ReadProductName.vbs)
- Script Function: ReadProductName (the function name in the VBS file)
- Install UI Sequence: After SetupInitialization

As with accessing MSI properties, accessing the running MSI database is valid only for custom actions scheduled for immediate execution.
For an example of accessing custom tables at run time, see the MSI Help Library section "How do I use a custom action to create user accounts on the local computer?", along with the corresponding code from the MSI Platform SDK.
Modifying Database Tables
Windows Installer also supports adding temporary records to a running MSI database. Perhaps the most common use for adding temporary records to a running database is to populate user-interface elements with data not available until run time. (Of course, this technique is appropriate only for Basic MSI projects; for InstallScript MSI projects, you populate and manipulate user-interface controls using the InstallScript functions CtrlSetText, CtrlSetList, CtrlSetCurSel, and so forth.)
For example, suppose you want to populate a ListBox control with the current values of every property listed in the Property table. To begin, you might add a ListBox control to the ReadyToInstall dialog box (using InstallShield's Dialog Editor), associating the control with the property LISTBOXPROP. (If desired, you can set the ListBox properties Sorted and Sunken to True.) Instead of populating the Items property of the ListBox control at design time, however, you will populate its items at run time by inserting temporary records into the ListBox table.
You might then place the following code in a source file called PropDisplay.vbs.
Const msiViewModifyInsertTemporary = 7
Const IDOK = 1

Function PropDisplay( )

' open and execute a view to the ListBox table
Set viewlist = Database.OpenView("SELECT * FROM `ListBox`
    WHERE `Property`='LISTBOXPROP'")
viewlist.Execute

' open and execute a view to the Property table
Set viewprop = Database.OpenView("SELECT * FROM `Property`")
    viewprop.Execute
Set recprop = viewprop.Fetch

r = 0

While Not (recprop Is Nothing)
' ListBox record fields are Property, Order, Value, Text
Set reclist = Installer.CreateRecord(4)

r = r + 1
reclist.StringData(1) = "LISTBOXPROP"
reclist.IntegerData(2) = r
reclist.StringData(3) = recprop.StringData(1)

reclist.StringData(4) = recprop.StringData(1)
& "=" & Session.Property(recprop.StringData(1))

' insert the temporary ListBox record
viewlist.Modify msiViewModifyInsertTemporary, reclist

' fetch the next Property record
Set recprop = viewprop.Fetch
Wend

' clean up
viewprop.Close: viewlist.Close
' return success to MSI
PropDisplay = IDOK
End Function
Note the use of the Modify method of the View object (with the insert-temporary constant), which modifies or adds a database record.
In the Custom Actions view, as before, right-click the Custom Actions icon and select New VBScript > Stored in the Binary table, renaming the action to callPropDisplay, browsing for PropDisplay.vbs in the VBScript Filename field, and specifying PropDisplay in the Script Function field.
You can then either schedule the action early in the User Interface sequence, or using a DoAction control event on the Next button of (say) the SetupType dialog box.
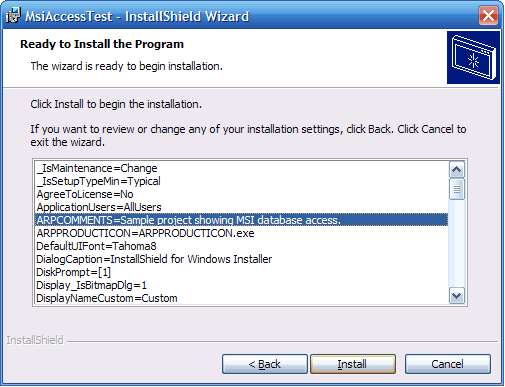
After building and running the MSI package, the ReadyToInstall dialog box showing the temporary records might appear as follows.

You will generally want to ensure that code inserting temporary records runs only once. The previous code will generate a run-time error if it is run twice, because calling the Modify method with the insert-temporary flag fails if a record with a given primary key already exists. An alternative is to delete any temporary records that exist, using code similar to the following at the beginning of the PropDisplay function:
Set viewlist = Database.OpenView("SELECT * FROM `ListBox`
WHERE `Property`='LISTBOXPROP'")

viewlist.Execute

Set reclist = viewlist.Fetch

' delete any existing LISTBOXPROP records

While Not (reclist Is Nothing)
  viewlist.Modify 6, reclist ' 6 = delete
  Set reclist = viewlist.Fetch
Wend

viewlist.Close
This block of code prevents clashes with existing ListBox/LISTBOXPROP records, therefore preventing errors if the user clicks the Back button and then revisits the ReadyToInstall dialog box.
As with ListBox controls with items populated at design time, the user's selection in the ListBox, if any, will be stored in the LISTBOXPROP (in this example) property. As always, only the value of a public property will be preserved when execution switches from the User Interface sequence to the Execute sequence.
You can use similar code to populate a ListBox control with a list of mapped network drives, user accounts, directory names, or other data that can be discovered only while an installation is running on a particular target system.
For a similar example using C (easily converted to InstallScript), see Dynamically Add and Remove Values from a Combo Box at Run Time.
When working with MSI database access at run time, you should keep the following in mind:
- Windows Installer does not support permanently modifying a running MSI database: changes you make at run time will not be stored in the MSI database cached on the user's system.
- Moreover, Windows Installer reloads the MSI database when execution switches from the User Interface sequence to the Execute sequence. Therefore, temporary modifications to a database made in the User Interface sequence will be lost when execution switches to the Execute sequence.
- As mentioned earlier, custom actions can access the running database only during immediate execution, and not deferred execution.
No ratings
Comments
May 02, 2019
03:40 AM
- Mark as Read
- Mark as New
- Permalink
- Report Inappropriate Content
May 02, 2019
03:40 AM
I am able to get values of the MSI database table for ComboBox or any MSI database table. However, when I tried to run on the InstallShield specific table (tables starts with IS), it throws the following error:
1615 (Error.BadQuerySyntax) \"SELECT * FROM ISProductConfigurationInstance\".
Is there any way to access values of InstallShield specific tables?
NOTE: We are using managed code (c# standard action and Install.ActiveDatabase.OpenView API) to get database values.