Adding a New Platform to FlexNet Embedded (updating vendor keys)
Adding a New Platform to FlexNet Embedded (updating vendor keys)
Summary
Process for adding a new platform to FlexNet Embedded by applying new Publisher/Platform keys to the "Publisher Identity Utility".
Synopsis
If a customer is sent new license (platform) keys from Revenera and the only purpose for them is to add additional platforms to FlexNet Embedded (FNE), you do not need to create a new identity. Instead, you only need to update the existing identity.
With older versions of FNO, this could be done directly via the UI. Newer versions of FlexNet Operations don't allow you to change vendor keys with existing identities directly. I.e., once you've created them, the vendor key fields are read only in the UI. So instead you need to export the identity, then modify it via the Publisher Identity Utility (pubidutil) from your toolkit (in the bin/tools directory).
To do this, open the downloaded identity with pubidutil and then change the vendor keys (and ONLY the vendor keys). And then click "Finish" to save it. Note, this allows you to include the new platforms without changing the internal seed values, so your older clients compiled with the original identity will still work with the licenses generated using the updated identity (which just added more platforms) as well as licenses generated with the pre-upgraded identity. After it's saved, import the updated identity back to FlexNet Operations and you should be good to go.
If you've inadvertently deleted your existing identity (and don't have a backup), you can create the identity again via the BackOfficeIdentity (which is where the internal seeds were originally generated). If you lost the BackOfficeIdentity, you're out of luck (unless you happen to have a backup of your database or some other means to get a copy of the original BackOfficeIdentity before you upgrade the identity to add new platforms with updated vendor keys).
Discussion
Following is the detailed set of instructions on updating an existing Identity with updated Publisher Keys :
1. In the Producer Portal select Administer / Identities, then select the identity that you have already created to View the Identity.
2. At the bottom of the View Identity page select "Binary File" to download and save the current Back Office Identity locally. The file name is IdentityBackOffice.bin.
Make a local backup copy as you can always revert back if necessary.
3. Run the pubidutil tool located in the /bin/tools directory of any of the FNE SDKs. If you don't have this readily available, you can download the tool from the Product and License Center via FlexNet Licensing/FlexNet Embedded/FlexNet Embedded Licenses & Tools:
4. Select Browse under Back-Office Identity and browse to the IdenityBackOffice.bin saved in Step 2.
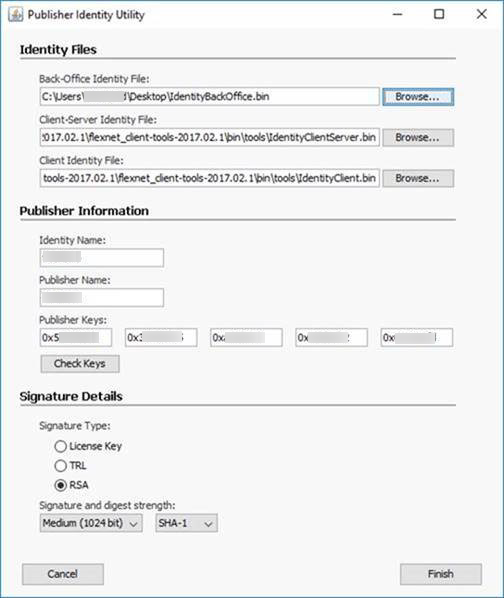
5. This will populate the UI with your existing keys & Identity Information (example shown below):
6. Update the Publisher Keys with the new keys you receive from Revenera. You can click "Check Keys" to make sure they were input correctly. It should respond with Expiration: Permanent.
7. Click Finish. Your IdentityBackOffice.bin has now been updated, you now need to upload this modified Identity in FlexNet Operations.
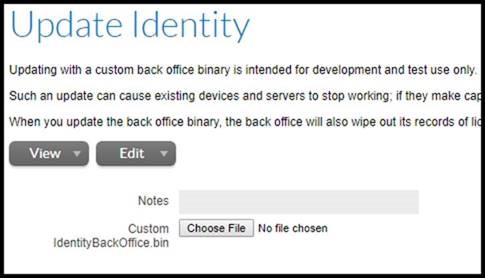
8. From the Producer Portal View Identity Screen select Edit this Identity. You should see the Update Identity menu shown below:
9. Select Choose File and browse to the location of the modified IdentityBackOffice.bin, followed by Save. You will receive a warning, select "I am sure" to complete. When you make an update to add additional platform support in this manner you will NOT affect any existing devices and requests from devices with the previous version of the identity will also work.
10. You can now download the client identities for use on platforms that were not previously enabled.