- Revenera Community
- :
- InstallShield
- :
- InstallShield Knowledge Base
- :
- Setting INSTALLDIR Based on a System Search and Install a Product to an Existing Destination
- Mark as New
- Mark as Read
- Subscribe
- Printer Friendly Page
- Report Inappropriate Content
Setting INSTALLDIR Based on a System Search and Install a Product to an Existing Destination
Setting INSTALLDIR Based on a System Search and Install a Product to an Existing Destination
Summary
This article explains how to locate an existing installation, another product, or some other specific location on a target machine during installation and then use this location as the destination for the current install.Synopsis
A common installation requirement is to install a product to a location relative to the location of an existing product or file. Examples are installing plug-ins or add-ons to an application. This article describes how to perform a Windows Installer system search, and then to set a project's installation directory based on the result.This article assumes some familiarity with using the InstallShield Installation Designer views to modify an installation project.
Discussion
Performing the System Search
Windows Installer supports several different types of system searches, which enable you at run time to search for files or directories on a target system, to read file or directory paths from the registry, or to read information from certain types of files. InstallShield provides a System Search Wizard, which simplifies the process of setting up these types of searches.
For this example, suppose you have a product whose files you want to install in the same directory as the InstallShield executable isdev.exe. One way to find the path to this file is to
read the Path value from the registry key
HKLM\SOFTWARE\MyProduct\InstalledLocation\isdev.exe.
Assuming you already have a Basic MSI project open in InstallShield, you can set up the system search as follows. First, open the System Search view, located in the Behavior and Logic view group. Next, right-click in the System Search area and select Add, which launches the System Search Wizard.
After you click Next on the Welcome panel (not pictured), the wizard prompts you for the type of search to perform. For this example, select "Folder path, as specified by a registry key".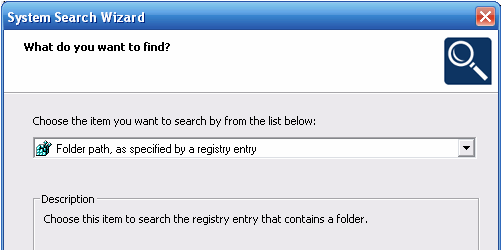
In the next panel, you specify the details of the registry information. For this example, use the following settings:
- Registry Root: HKEY_LOCAL_MACHINE
- Registry Key: Software\MyProduct
- Registry Value: InstalledLocation
In the last panel, you specify the name of a property to store the results. For this example, you can type in a custom property name INSTALLEDLOCATION.
When you build and run the project, the Windows Installer service reads the registry data and stores it in the custom INSTALLEDLOCATION property.
During testing, to verify that the property is being set, you can create an MSI log file and search for the property name, or temporarily add a text field to the InstallWelcome dialog box with text "INSTALLEDLOCATION = [INSTALLEDLOCATION]".
Setting INSTALLDIR Based on the Search Results
The next step is to set INSTALLDIR to the value stored in the custom INSTALLEDLOCATION property. One way to set the property is with a set-a-directory custom action in the Custom Actions view.
To create the custom action, begin by selecting the Custom Actions view, also located in the Behavior and Logic view group. Next, right-click the Custom Actions icon and select "New Set Directory", renaming the new action to (for example) "setInstalldirFromSystemSearch".
Next, use the following settings:
- Directory Name: INSTALLDIR
- Directory Value: [INSTALLEDLOCATION]
- Execution Scheduling: Execute only once
- Install UI Sequence: After CostFinalize
- Install UI Condition: INSTALLEDLOCATION and (Not Installed)
- Install Exec Sequence: After CostFinalize
- Install Exec Condition: INSTALLEDLOCATION and (Not Installed)
After you build and run the installation, the project's files should be installed to the same directory as the isdev.exe executable.
Related KB Articles
Q111409- Mark as Read
- Mark as New
- Permalink
- Report Inappropriate Content
very clear and great article. it works. thanks for help. 😊 👍