This website uses cookies. By clicking Accept, you consent to the use of cookies. Click Here to learn more about how we use cookies.
Turn on suggestions
Auto-suggest helps you quickly narrow down your search results by suggesting possible matches as you type.
- Revenera Community
- :
- InstallShield
- :
- InstallShield Knowledge Base
- :
- Designing an Update-Friendly MSI Installation
Subscribe
- Mark as New
- Mark as Read
- Subscribe
- Printer Friendly Page
- Report Inappropriate Content
Designing an Update-Friendly MSI Installation
Designing an Update-Friendly MSI Installation
Summary
How to design a MSI that updates easilySynopsis
The design of the first release of your original MSI installation project can have a significant effect on the success of later updates applied to it. The following tips are for organizing your initial MSI installation project, and where appropriate describes the applicable Windows Installer behavior or best-practices guidelines that motivate these tipsNOTE: These tips apply largely to minor upgrades. In general, the uninstall-then-reinstall nature of major upgrades makes them less susceptible to problems related to the organization of an installation project.
Discussion
Tip 1. Whenever possible, use versioned key files.Part of Windows Installer?s contribution to system stability is the enforcement of strict file-versioning rules. However, MSI ordinarily performs version comparison only on the key file of a component when deciding whether to install a component during a reinstallation or update installation. A simple way to ensure that a component will be updated in your new product version is to give your key file a newer version than the corresponding file on the target system.
This tip is related to the MSI best-practice rule of putting at most one portable executable file?EXE, DLL, OCX, and the like?in a component, and marking that file as the key file of its component. In addition to giving you the most effective repair mode for your installation, having more components leads to more desirable default behavior if only some of your files are updated in your new product version.
Tip 2. Partition your product into discrete sets of features.
The primary use of features is to provide user-selectable pieces of your product?s functionality. An early part of the design of your installation program is to define the features (and subfeatures, and so forth) that you want the user to be able to see and configure.
Most installers provide a custom setup type, which displays to the user a panel similar to the following, where the user can select which product features to install.
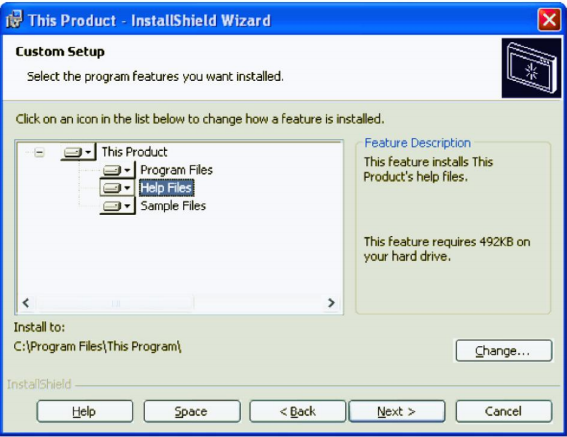
This end-user view of your installer is the foundation of the other features you need to configure.
There is no fixed list of rules for dividing an application into features. In some cases, the architecture of your application will suggest divisions into features (Program Files, Help Files, Tools, Examples, and so forth). In other cases, it will be necessary to define artificial boundaries within your application to create features of a manageable size.
After you partition your product into user-selectable features, you can further divide these features into subfeatures. For each of these subfeatures, you can set the Display attribute to Not Visible, set the Remote Installation attribute to Favor Parent, and set the Required attribute to Yes. In this case, the user will see and interact with only the visible features, but the installation will behave as if all the application resources in the subfeatures are part of the main feature. Note that marking a subfeature as Required will cause the subfeature to be installed only if its parent feature is installed.
The more features your project has, the more flexibility you have in reinstallation behavior. The REINSTALL property, which should be set during a minor upgrade installation, accepts a list of features to reinstall. When applying a minor upgrade (especially as a patch), you should not use the setting REINSTALL=ALL, but instead explicitly specify the features that you want to reinstall.
A related common practice is to create a top-level ?product? feature, as in the figure above.
Tip 3. Put user-configurable registry data in its own feature.
When a minor upgrade is applied, all of the registry data in all the features being reinstalled will also be reinstalled; this will occur even if the component containing the registry data is not being updated. This means that any registry settings that have been modified from their original values will revert to their default values. In some cases this is acceptable behavior, but usually you will not want to replace the user?s configuration settings with the original factory settings.
If you place user-configurable registry data in its own feature, as described in the previous tip, that feature will not be reinstalled unless it is listed in the value of the REINSTALL property being set during the update.
If you want not to reinstall any registry data, you can also omit the ?"m" and ?"u" flags from the REINSTALLMODE value. However, this setting applies to the entire installation, and can have undesirable effects during the application of a patch.
Tip 4. MSI property values are not automatically saved during the initial installation.
With a few exceptions, the values of MSI properties that are set during the initial installation will not be available during maintenance mode or an update scenario. If you believe you will need a property?s value to be available to a later maintenance or update installation, one common practice is to write the property?s value to the registry during the initial installation, and read the data back during the later installation.
To write a property?s value to the registry, you can take advantage of the fact that the Value field of the Registry table uses the MSI data type Formatted. MSI database fields that use the Formatted data type will expand expressions of the form [PropertyName] into the value of the specified property at run time. For example, to write the account name of the user running the installation into the registry, you can create a value with data ?"[LogonUser]".
To read back registry data during a later installation, you can populate the AppSearch and RegLocator tables, or use the InstallShield System Search Wizard to populate the tables for you. Of course, you can instead create a custom action script or DLL to read the registry data for you. (You can attach the condition ?"Not Installed" to an action you want to run only for a first-time installation, and use the condition ?"Installed" for an action that should run only during a maintenance operation.)
The exceptions mentioned earlier are the values of the MSI properties USERNAME, COMPANYNAME, and ProductID, which are available using the MsiGetUserInfo API function; and the values of ProductVersion and most Add or Remove Programs settings, available with the MsiGetProductInfo API function.
A common requirement is to save the value of the main product installation directory, often stored in the INSTALLDIR property, so that the value is available during a maintenance or update operation. The value of the built-in property ARPINSTALLLOCATION is automatically written to the target system?s registry, and is available using the MsiGetProductInfo function. To set ARPINSTALLLOCATION to the value of INSTALLDIR, you can create a set-a-property (Type-51) custom action with source ARPINSTALLLOCATION and target [INSTALLDIR], scheduling it in the Execute sequence after the standard CostFinalize action. If you use InstallShield to create a project, such a custom action is automatically included.
No ratings