This website uses cookies. By clicking Accept, you consent to the use of cookies. Click Here to learn more about how we use cookies.
Turn on suggestions
Auto-suggest helps you quickly narrow down your search results by suggesting possible matches as you type.
- Revenera Community
- :
- InstallShield
- :
- InstallShield Knowledge Base
- :
- Creating MSI Update Packages
Subscribe
- Mark as New
- Mark as Read
- Subscribe
- Printer Friendly Page
- Report Inappropriate Content
Creating MSI Update Packages
Creating MSI Update Packages
Summary
This article describes the database changes required for different types of MSI updatesSynopsis
This article describes the database changes required for different types of MSI updates, and describes how to use the tools provided in InstallShield to simplify the update-development process.Discussion
Minor UpgradesIn addition to the new files and other data in your update package, to create a minor upgrade you must change the package code and product version of your installer.
NOTE: By default, when you run an installation from the InstallShield environment by clicking the Run toolbar button, InstallShield will quietly uninstall any previous version of your product present on the development machine. To change this setting so that deploying an installation from the environment will use the default MSI behavior, pull down the Tools menu, select Options, select the Preferences tab, and clear the check box labeled ?Uninstall before installing?.
To deploy the minor upgrade, a typical command line is the following:
msiexec /i product.msi REINSTALLMODE=voums REINSTALL=ALLIf the update contains features that you do not want to update, you should set REINSTALL to a comma-separated list of the features that you do want to update, as in the following command (names you use in the REINSTALL property are case-sensitive):
msiexec /i product.msi REINSTALLMODE=voums REINSTALL=F1,F3,F5The important setting for deploying a minor upgrade is the REINSTALLMODE flag ?v?, which indicates to run the installer using the updated MSI database and to re-cache the package based on the new database. Without the ?v? flag, Windows Installer runs the installer based on the cached version of the existing earlier product version.
NOTE: You must take care not to set REINSTALL=ALL for a first-time installation. Later you will see how InstallShield can create a setup launcher that sets REINSTALL dependent on whether an earlier version of the product is present on the target system.
Major Upgrades
For a major upgrade, as indicated in the earlier table, you must change the package code (in the Summary Information Stream); you will usually change the product version (in the ProductVersion property in the Property table); and now must also change the product code (the ProductCode property in the Property table).
When you change the product code, Windows Installer treats your latest and previous product versions as unrelated, even though the ProductName values are likely the same. If you want both versions of your product to be installable on the same system, you can simply change the product code and the main installation directory (often INSTALLDIR). (Naturally, the application must have been developed to support multiple simultaneous instances by separating each instance?s configuration settings and data files.)
If instead you want your latest product version to supersede an earlier installed version, you will populate records in the Upgrade table. A record in the Upgrade table contains the following fields:
- The UpgradeCode value of the product(s) you want to update.
- A range of versions of products to update.
- Optional language information for the product to update.
- An optional list of features to remove.
- A public property (called an ?action property?) associated with any products to update.
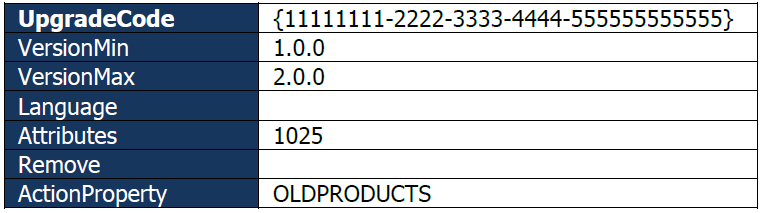
The bit flags used in the Attributes field are described in the MSI Help Library page ?Upgrade Table?. The value 1025 used here means that all languages should be detected (1024) and that feature states should be migrated (1) from the installed product to the latest product.
In addition to adding records to the Upgrade table, some further authoring steps required are to:
- Add the action property name to the value of the SecureCustomProperties property.
- Ensure the value of ALLUSERS is the same in the before and after versions, through a custom action or from the command line.
At run time, the standard MSI action FindRelatedProducts reads the records in the Upgrade table, and, if a related product is found, the product code for that product is added to the action property. FindRelatedProducts is by default placed early in both the User Interface and Execute sequences.
The MigrateFeatureStates action (if appropriate) attempts to migrate the feature-selection states from an installed product version to the newer version. Finally, the standard RemoveExistingProducts action reads the product codes stored in the Upgrade table action property, and in effect performs silent nested-uninstallation actions on those products.
The RemoveExistingProducts action can be placed in different locations to define different types of upgrade behavior. In short, placing RemoveExistingProducts early in the Execute sequence instructs Windows Installer to completely remove the existing product data before installing the new product. Placing RemoveExistingProducts late in the Execute sequence causes the upgrade to install the new product data, and then remove old data.
TIP: The Attributes field of the Upgrade table also supports a detect-only bit (value 2). If an Upgrade record has the detect-only bit set, the action property defined in that record will be populated with the product codes of corresponding product versions, but the RemoveExistingProducts action will not remove those products. The detect-only bit is useful, for example, when creating a custom action that prevents an older version of the product from installing over a newer version. Recent InstallShield versions automatically create such an Upgrade-table record and custom action for new Basic MSI projects. For more information about creating such a custom action, see the MSI Help Library page ?How do I prevent an old package from installing over a newer version??
TIP: If you use the same UpgradeCode value for every release of your product, an external program or custom action can determine the product codes of any installed copies of your product using the MSI API MsiEnumRelatedProducts, or the RelatedProducts property of the MSI Automation interface.
When you define a major upgrade, it can be useful to run MSI validation on your upgrade package. The rules ICE61, ICE63, and ICE74 can detect package-authoring errors related to major upgrade packages. By default, InstallShield performs upgrade validation during the build process to flag common authoring problems with the different types of upgrades.
To deploy a major upgrade package, the user can simply launch the MSI database or setup launcher, without needing to set any special values for REINSTALLMODE or REINSTALL.
Additional Information
For more information see the article about Windows Installer support for three types of product upgrades:Major Upgrade vs. Minor Upgrade vs. Small Update
No ratings